> ## Documentation Index
> Fetch the complete documentation index at: https://openmetadata-docs-release-watchers.mintlify.site/llms.txt
> Use this file to discover all available pages before exploring further.
# Data Products
> Define and manage data products as part of your governance strategy to track ownership, value, and metadata lineage efficiently.
# Data Products
A Data Product packages curated data assets under a single entity with defined ownership, type, and visibility. Create one from the **Data Marketplace**, or from within a **Domain** if it belongs to a specific one. This guide walks through both paths, plus adding assets, input and output ports, and finding a data product's assets from the Explore page.
## Add a Data Product
To create a new data product, follow these steps:
### Step 1: Access Data Products
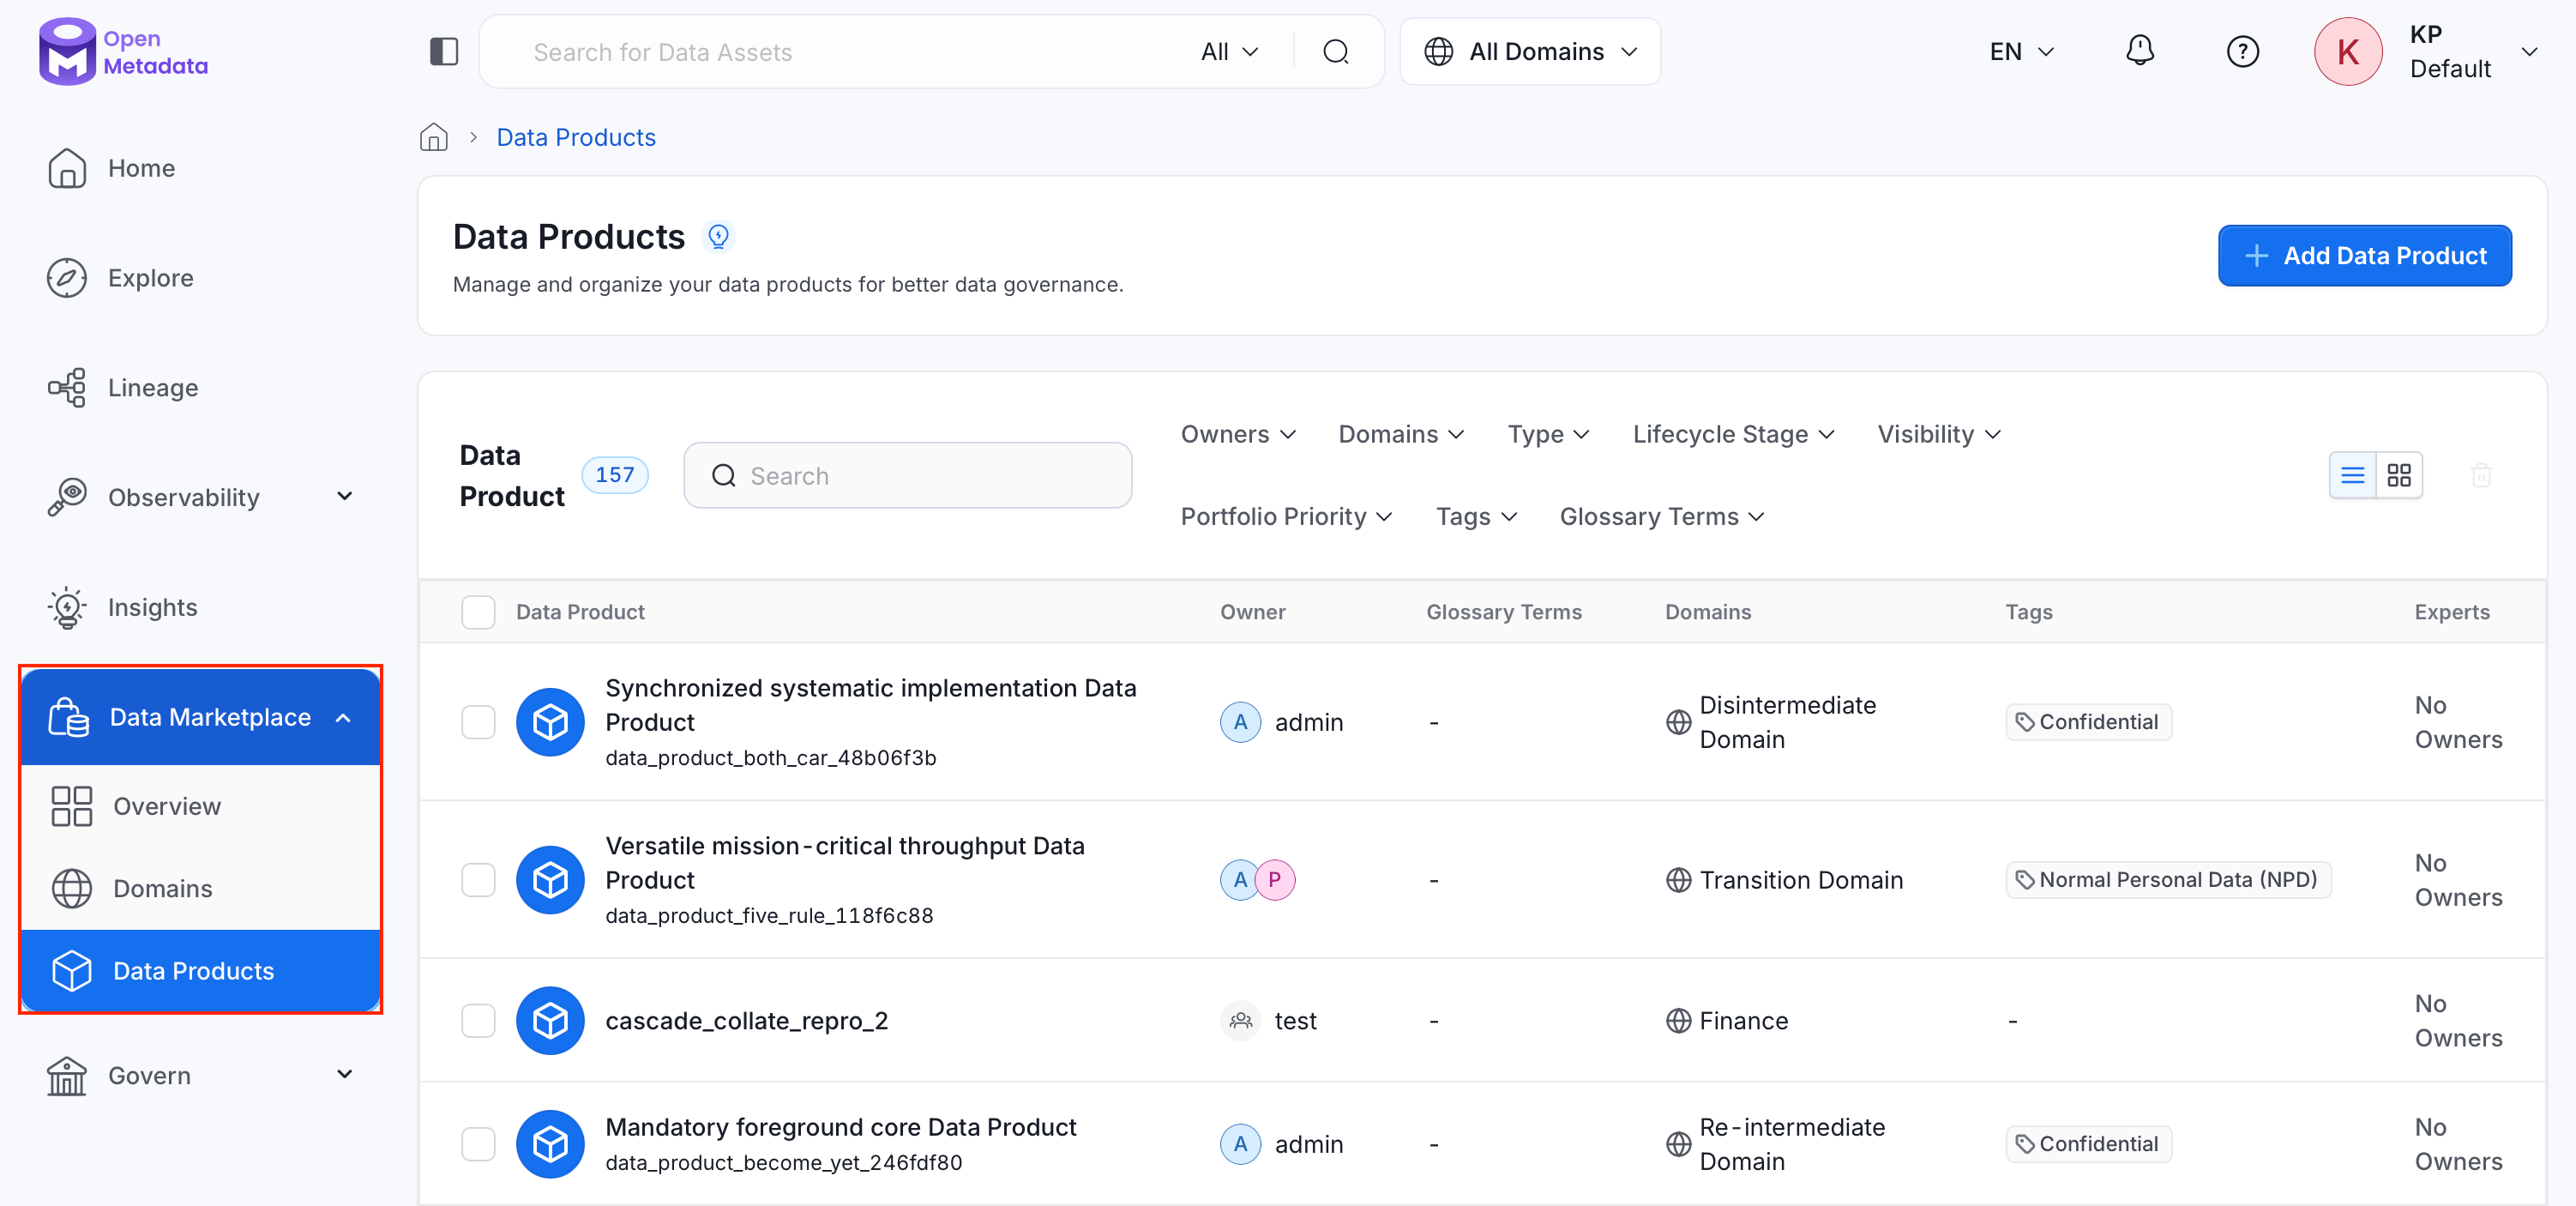
1. In the left navigation bar, click **Data Marketplace**, then select **Data Products**.
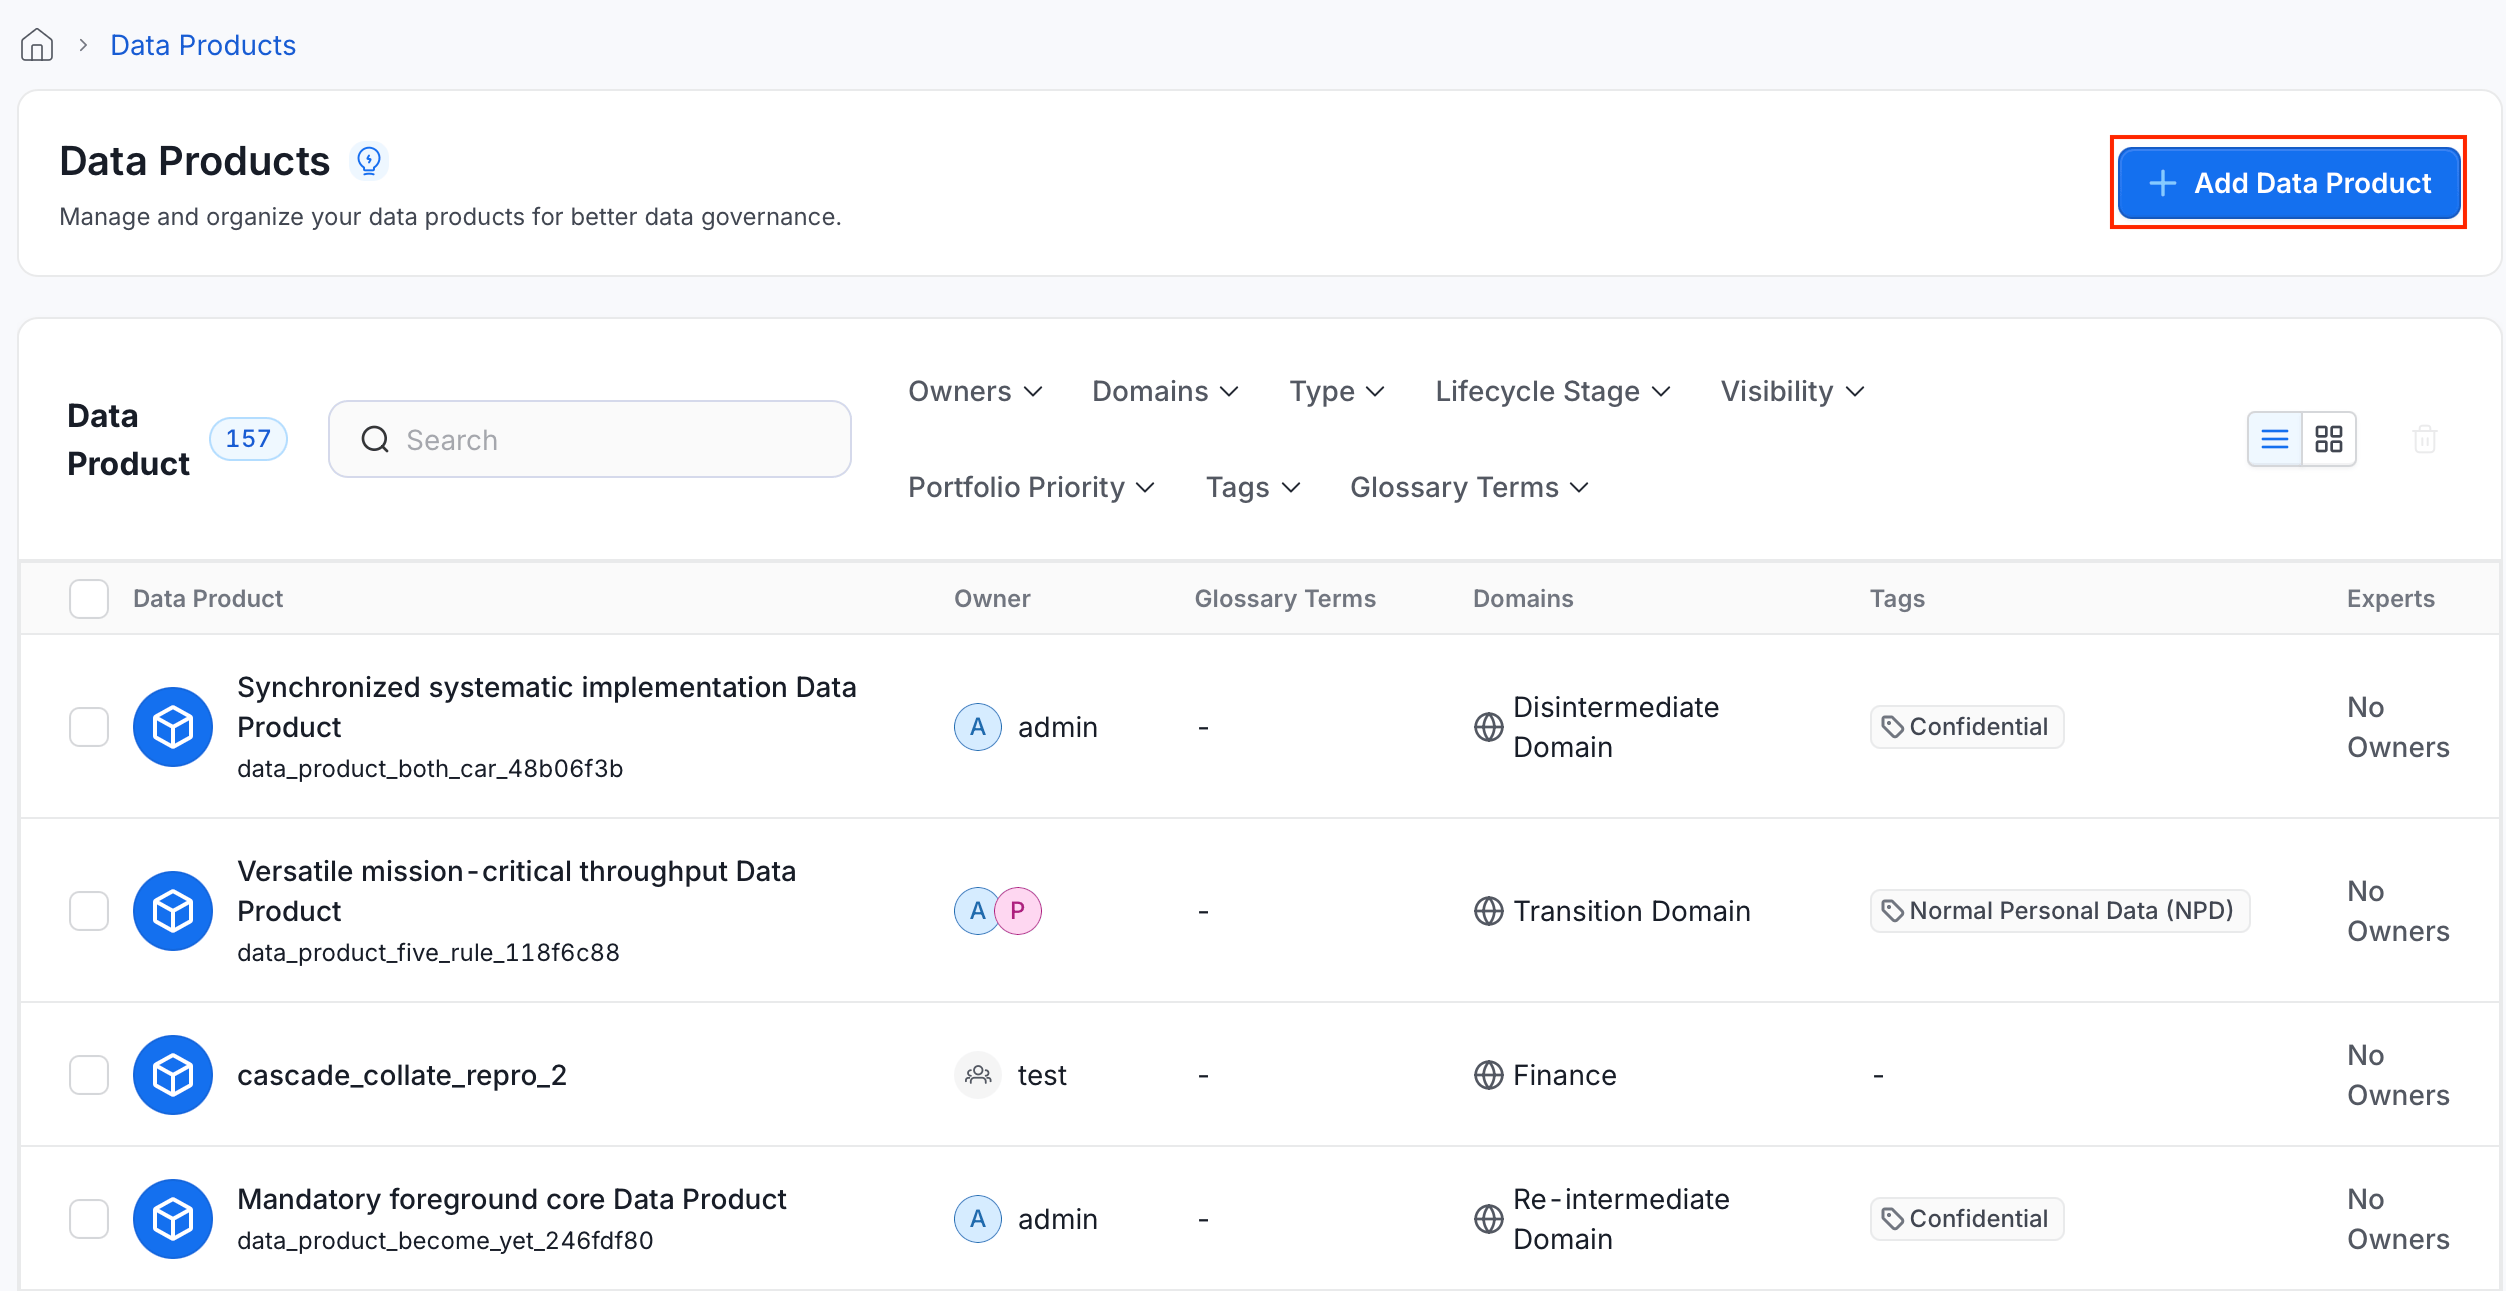
 2. Click **Add Data Product**.
 ### Step 2: Enter Data Product Details
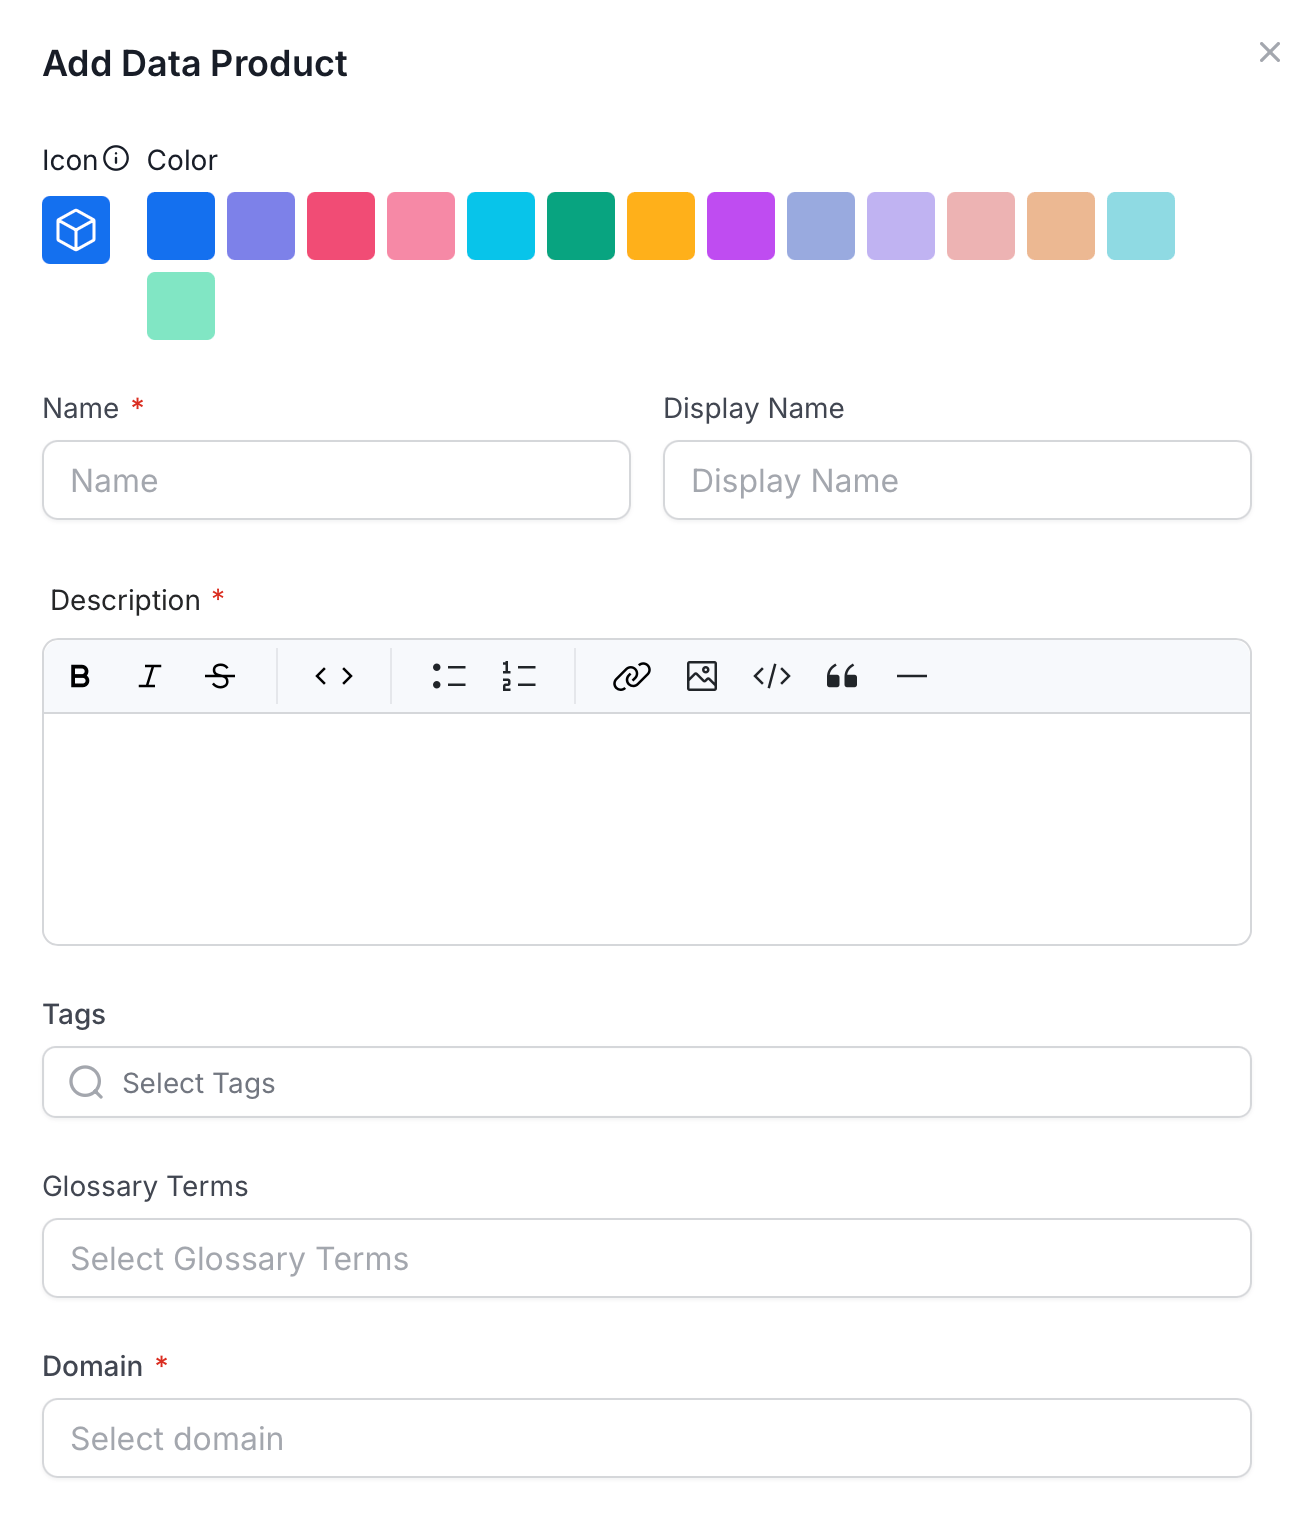
* **Icon** and **Color**: Select an icon and color to visually identify the data product in the catalog.
* **Name** (required): Enter a unique identifier for the data product.
* **Display Name**: Enter a human-readable label shown throughout the UI.
* **Description** (required): Explain the data product's purpose, the data it contains, and any context other users need.
### Step 2: Enter Data Product Details
* **Icon** and **Color**: Select an icon and color to visually identify the data product in the catalog.
* **Name** (required): Enter a unique identifier for the data product.
* **Display Name**: Enter a human-readable label shown throughout the UI.
* **Description** (required): Explain the data product's purpose, the data it contains, and any context other users need.
 ### Step 3: Add Tags and Glossary Terms
* **Tags**: Select classification tags to categorize the data product.
* **Glossary Terms**: Link the data product to relevant glossary terms.
### Step 4: Configure Data Product Settings
* **Domain** (required): Select the domain this data product belongs to.
* **Type**: Select a data product type, for example Dataset, Raw Data, Derived Data, Reports, or Analytic View.
* **Visibility**: Control who can discover this data product.
| Visibility | Access |
| ---------------- | ----------------------------------------- |
| **Private** | Visible to the creator only. |
| **Invitation** | Visible to invited users. |
| **Dataspace** | Visible within the dataspace. |
| **Organisation** | Visible to all users in the organization. |
| **Public** | Visible to anyone. |
* **Portfolio Priority**: Indicate the data product's importance (Critical, High, Medium, or Low).
### Step 5: Assign People
* **Owners**: Select the users or teams responsible for the data product.
* **Experts**: Select individual users with deep knowledge of the data product.
* **Reviewers**: Select users who review and approve changes to the data product.
### Step 6: Save Data Product
Click **Save**. The data product appears in the Data Products list.
## Add a Data Product from Within a Domain
If a data product belongs to a specific domain, create it directly from that domain instead:
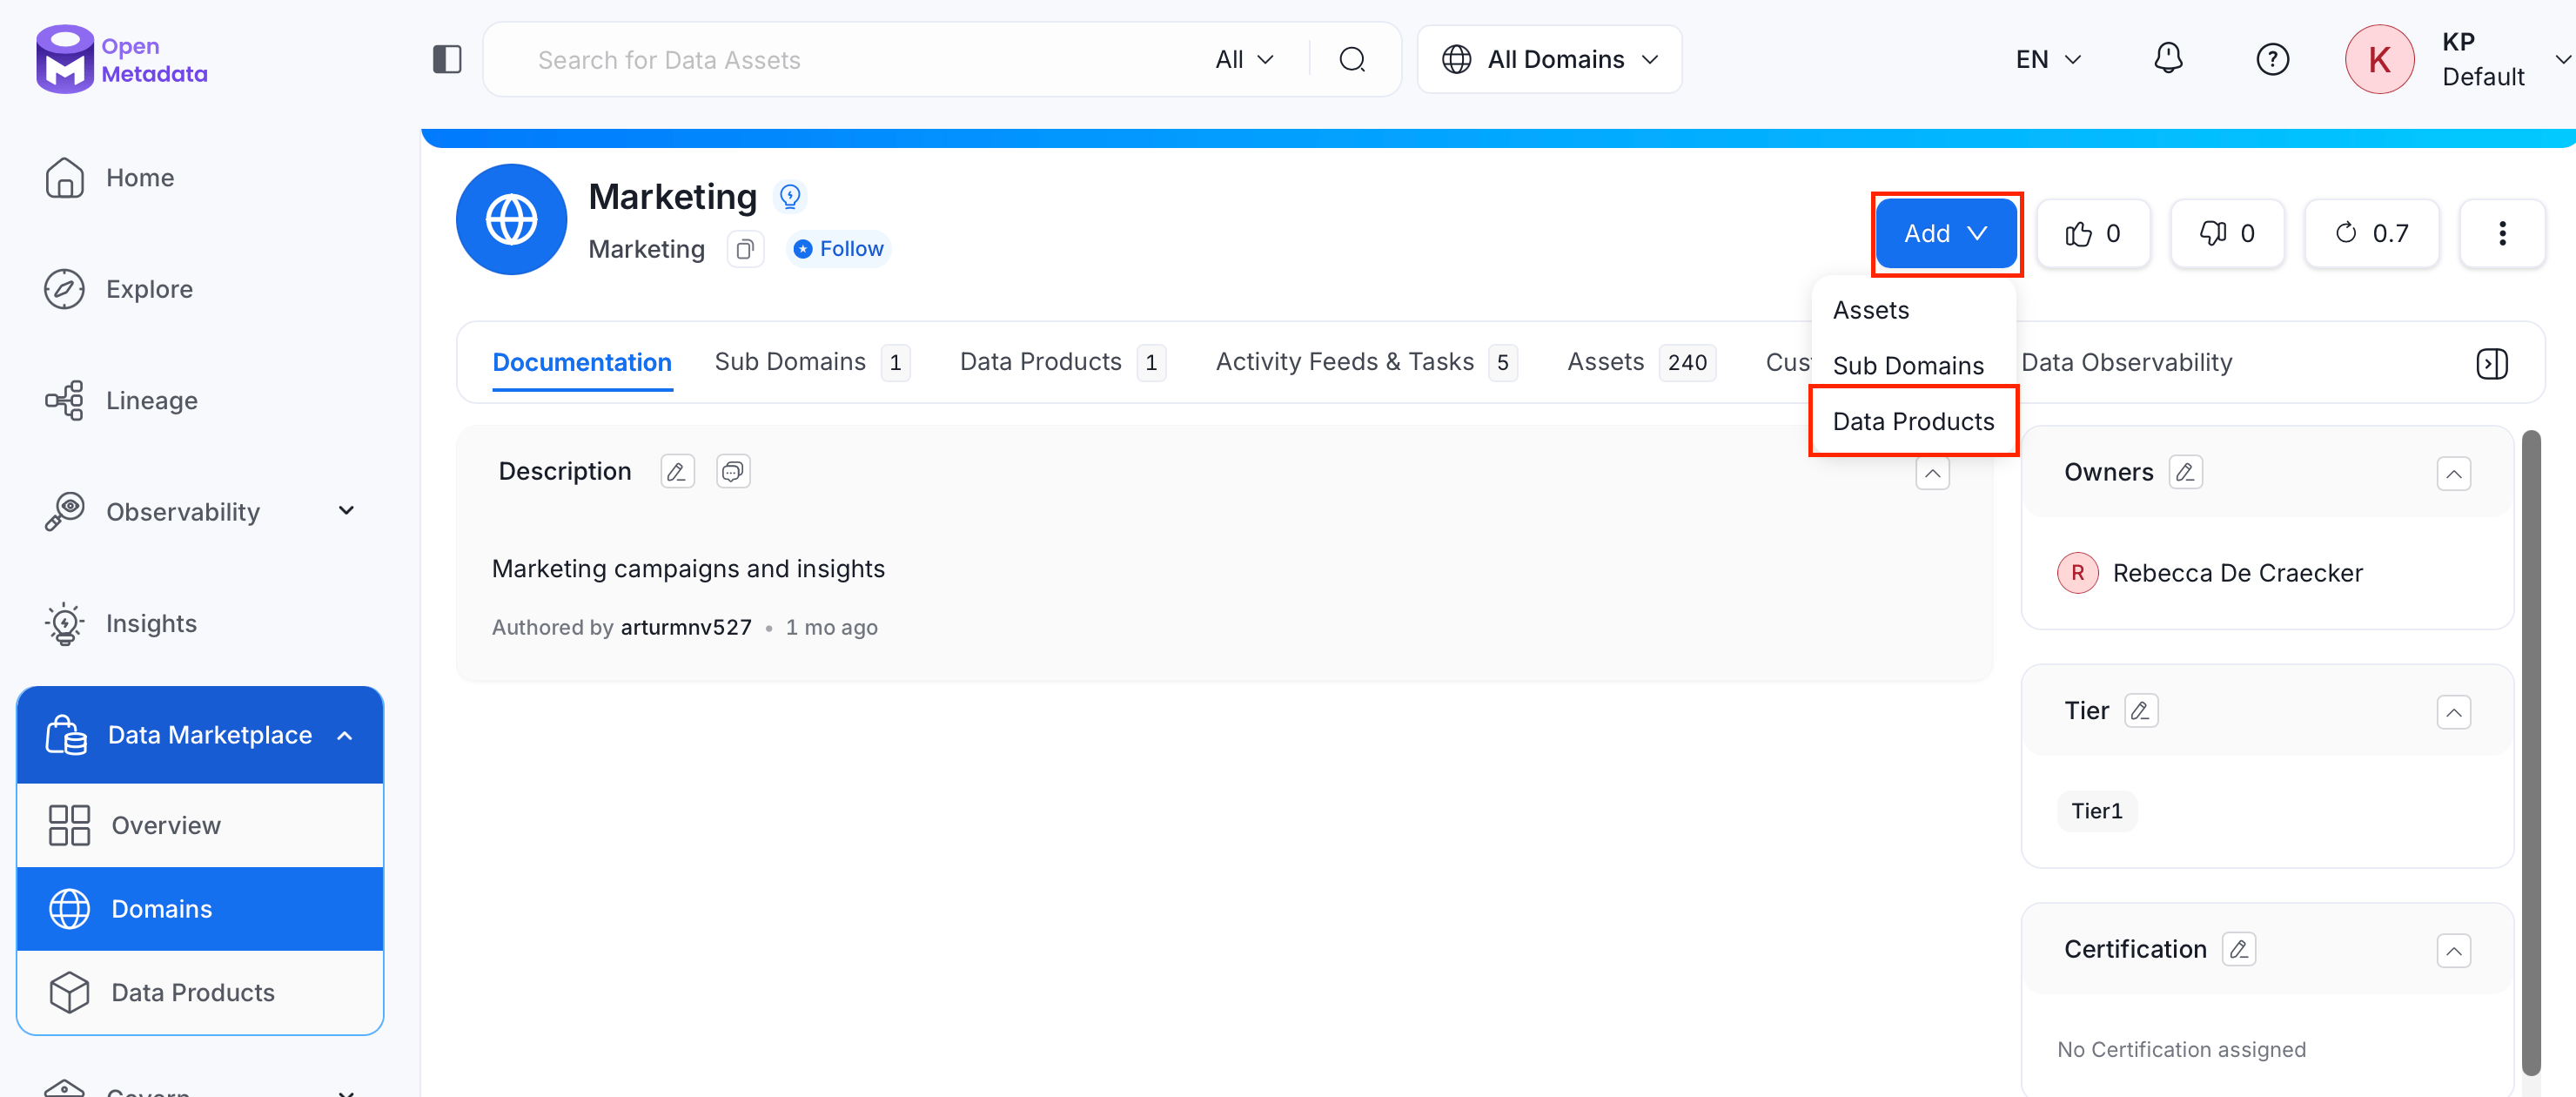
1. Navigate to **Data Marketplace** > **Domains**, then open the domain the data product should belong to.
2. Click **Add** and select **Data Products**.
### Step 3: Add Tags and Glossary Terms
* **Tags**: Select classification tags to categorize the data product.
* **Glossary Terms**: Link the data product to relevant glossary terms.
### Step 4: Configure Data Product Settings
* **Domain** (required): Select the domain this data product belongs to.
* **Type**: Select a data product type, for example Dataset, Raw Data, Derived Data, Reports, or Analytic View.
* **Visibility**: Control who can discover this data product.
| Visibility | Access |
| ---------------- | ----------------------------------------- |
| **Private** | Visible to the creator only. |
| **Invitation** | Visible to invited users. |
| **Dataspace** | Visible within the dataspace. |
| **Organisation** | Visible to all users in the organization. |
| **Public** | Visible to anyone. |
* **Portfolio Priority**: Indicate the data product's importance (Critical, High, Medium, or Low).
### Step 5: Assign People
* **Owners**: Select the users or teams responsible for the data product.
* **Experts**: Select individual users with deep knowledge of the data product.
* **Reviewers**: Select users who review and approve changes to the data product.
### Step 6: Save Data Product
Click **Save**. The data product appears in the Data Products list.
## Add a Data Product from Within a Domain
If a data product belongs to a specific domain, create it directly from that domain instead:
1. Navigate to **Data Marketplace** > **Domains**, then open the domain the data product should belong to.
2. Click **Add** and select **Data Products**.
 3. Follow [Add a Data Product](#add-a-data-product) steps 2 to 6.
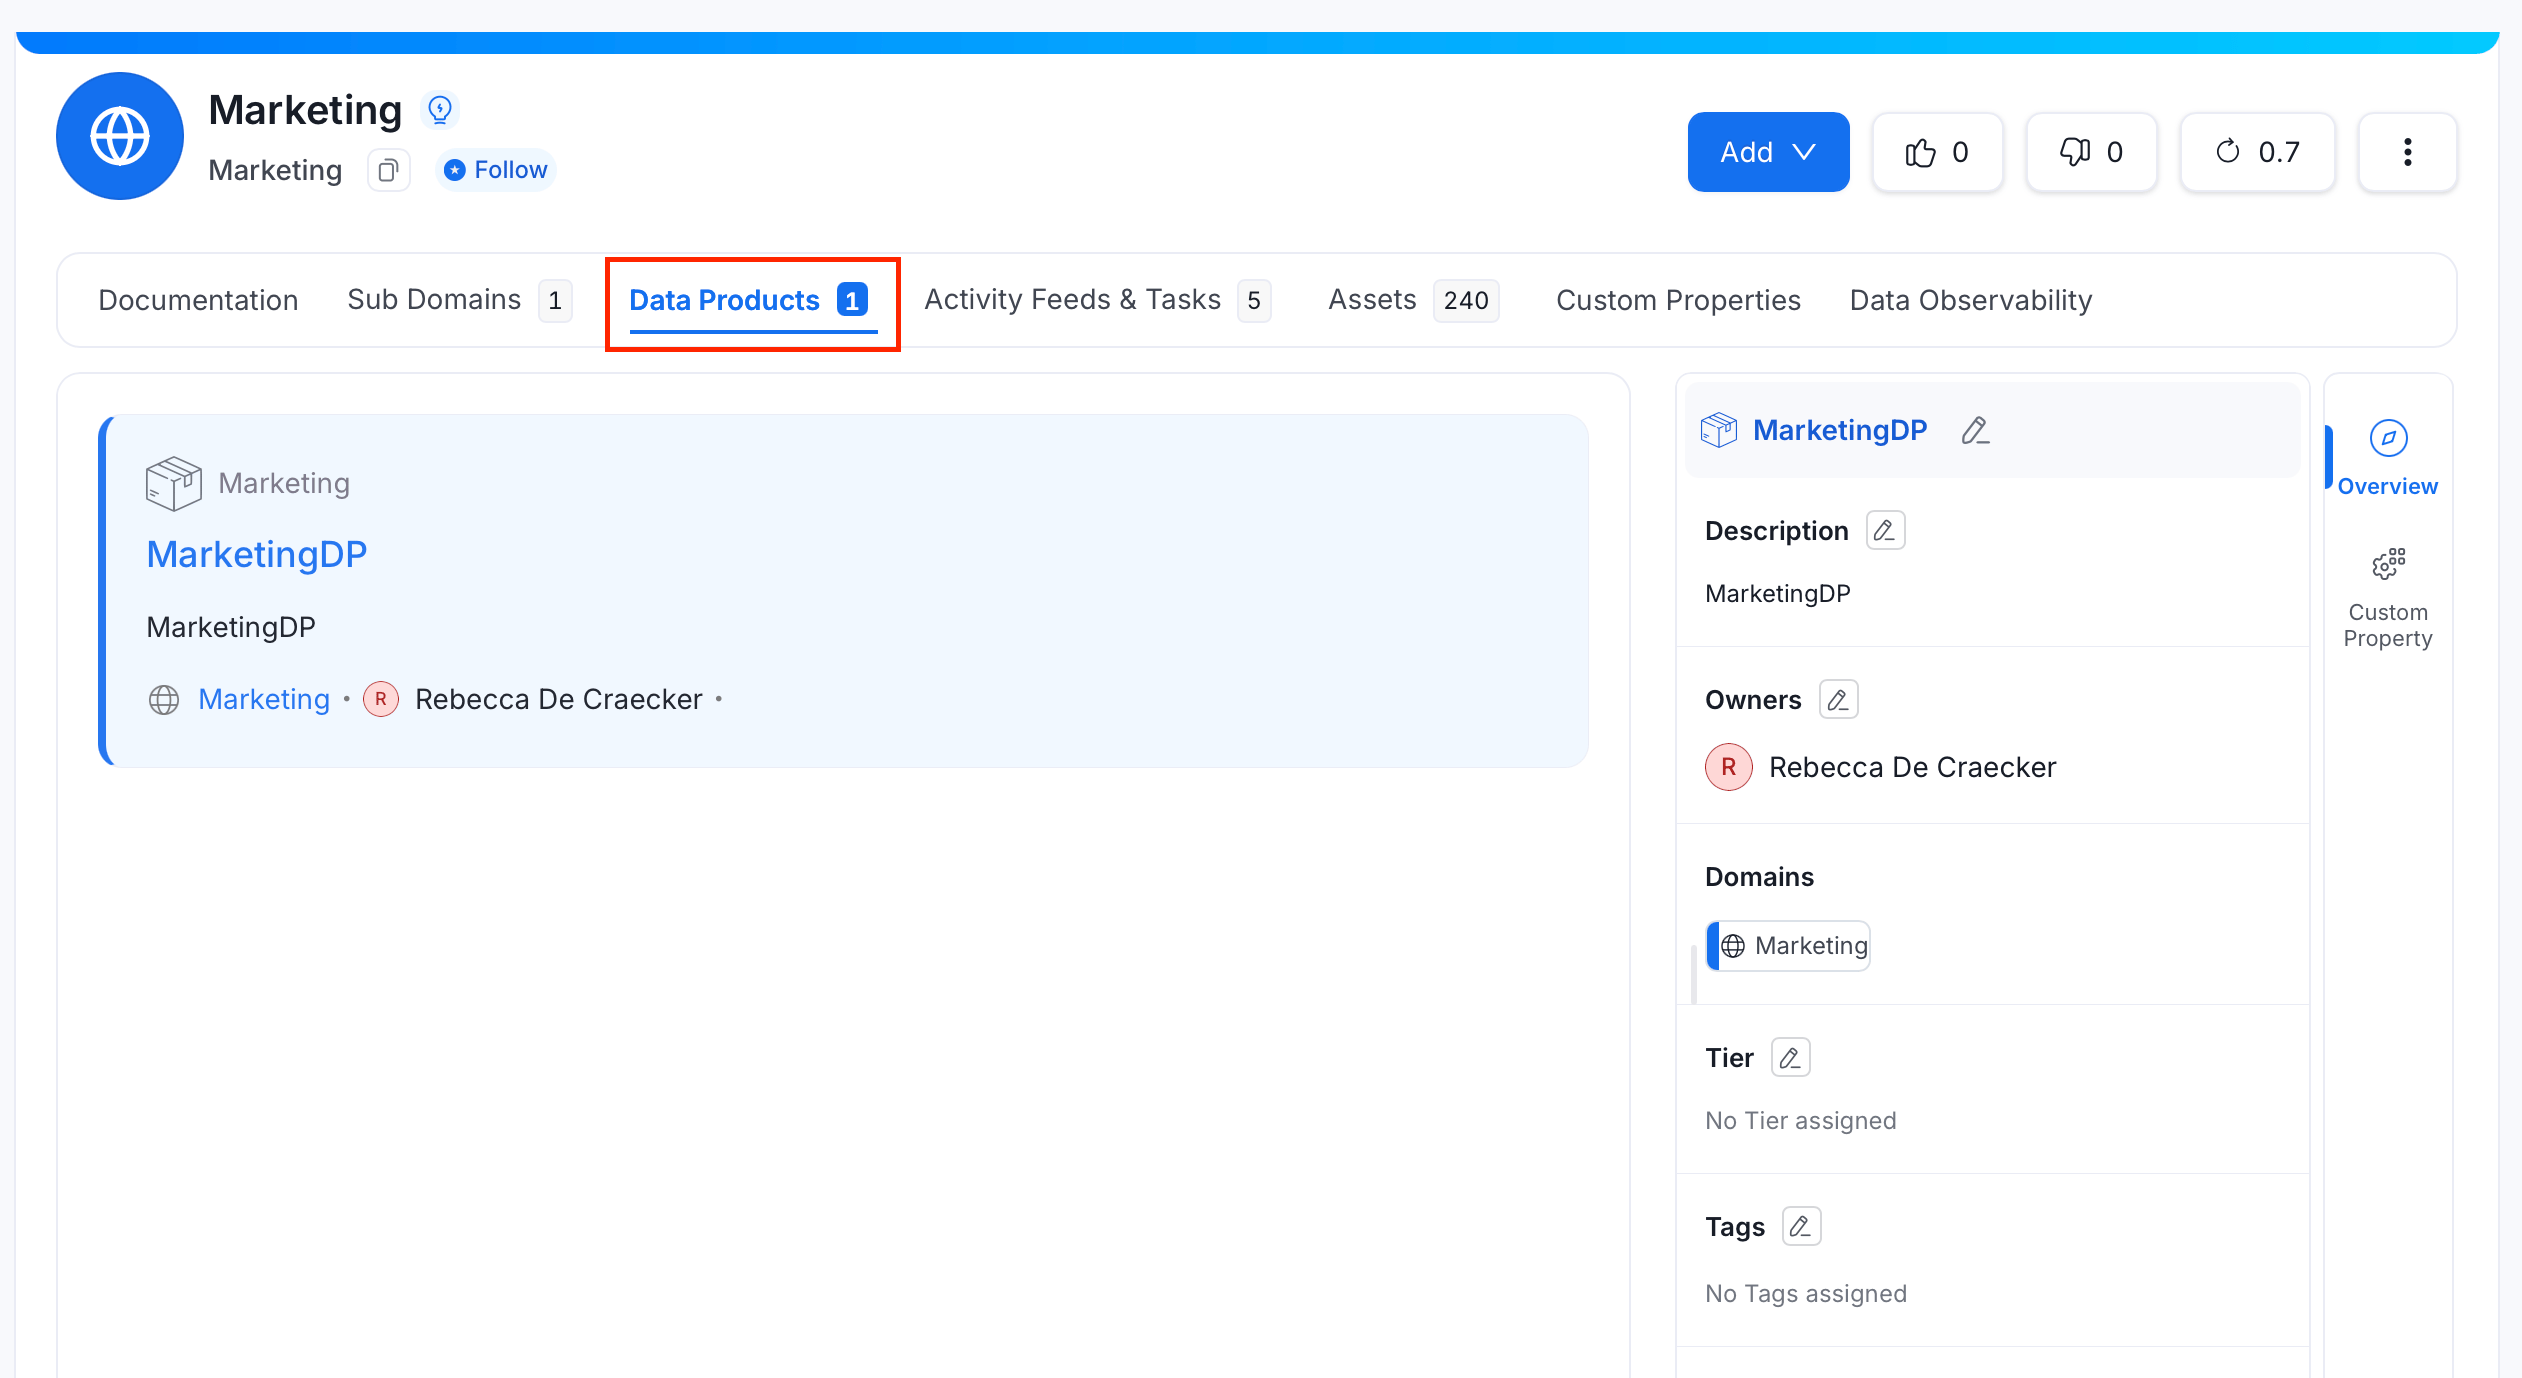
In the **Data Products** tab, you can view the list of all data products related to the selected domain.
3. Follow [Add a Data Product](#add-a-data-product) steps 2 to 6.
In the **Data Products** tab, you can view the list of all data products related to the selected domain.
 ## Add Data Assets to the Data Product
1. From the Data Products list, open the data product's detail page.
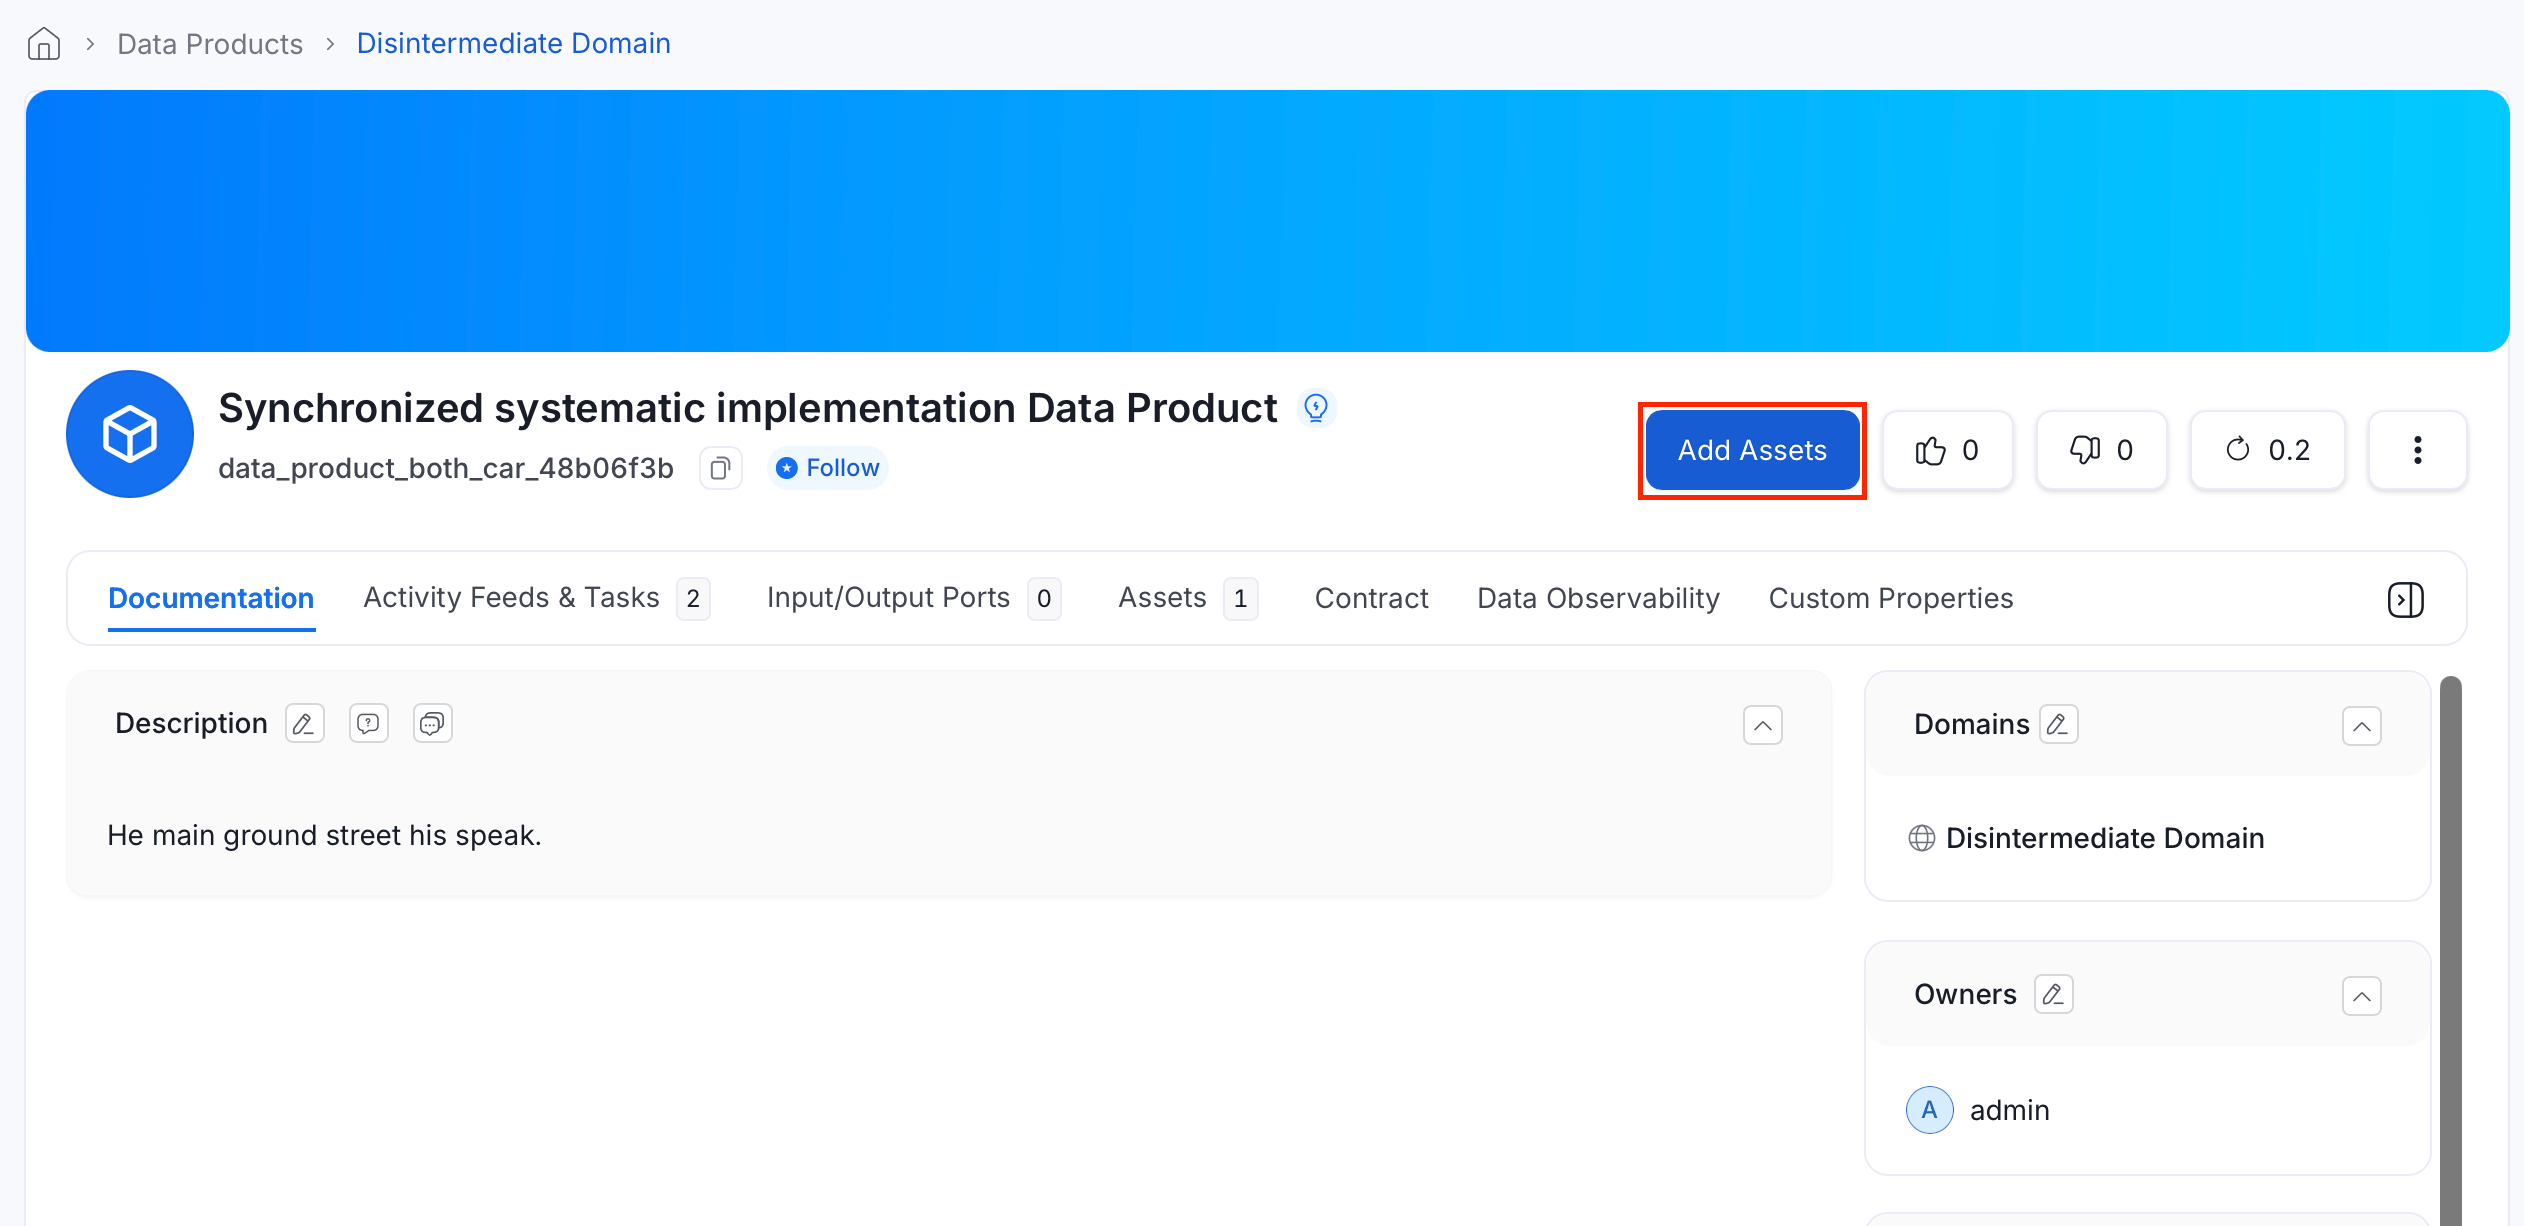
2. Click **Add Assets**.
## Add Data Assets to the Data Product
1. From the Data Products list, open the data product's detail page.
2. Click **Add Assets**.
 3. Search for assets, or use the filters (entity type, owner, tag, tier, service, service type) to narrow the results.
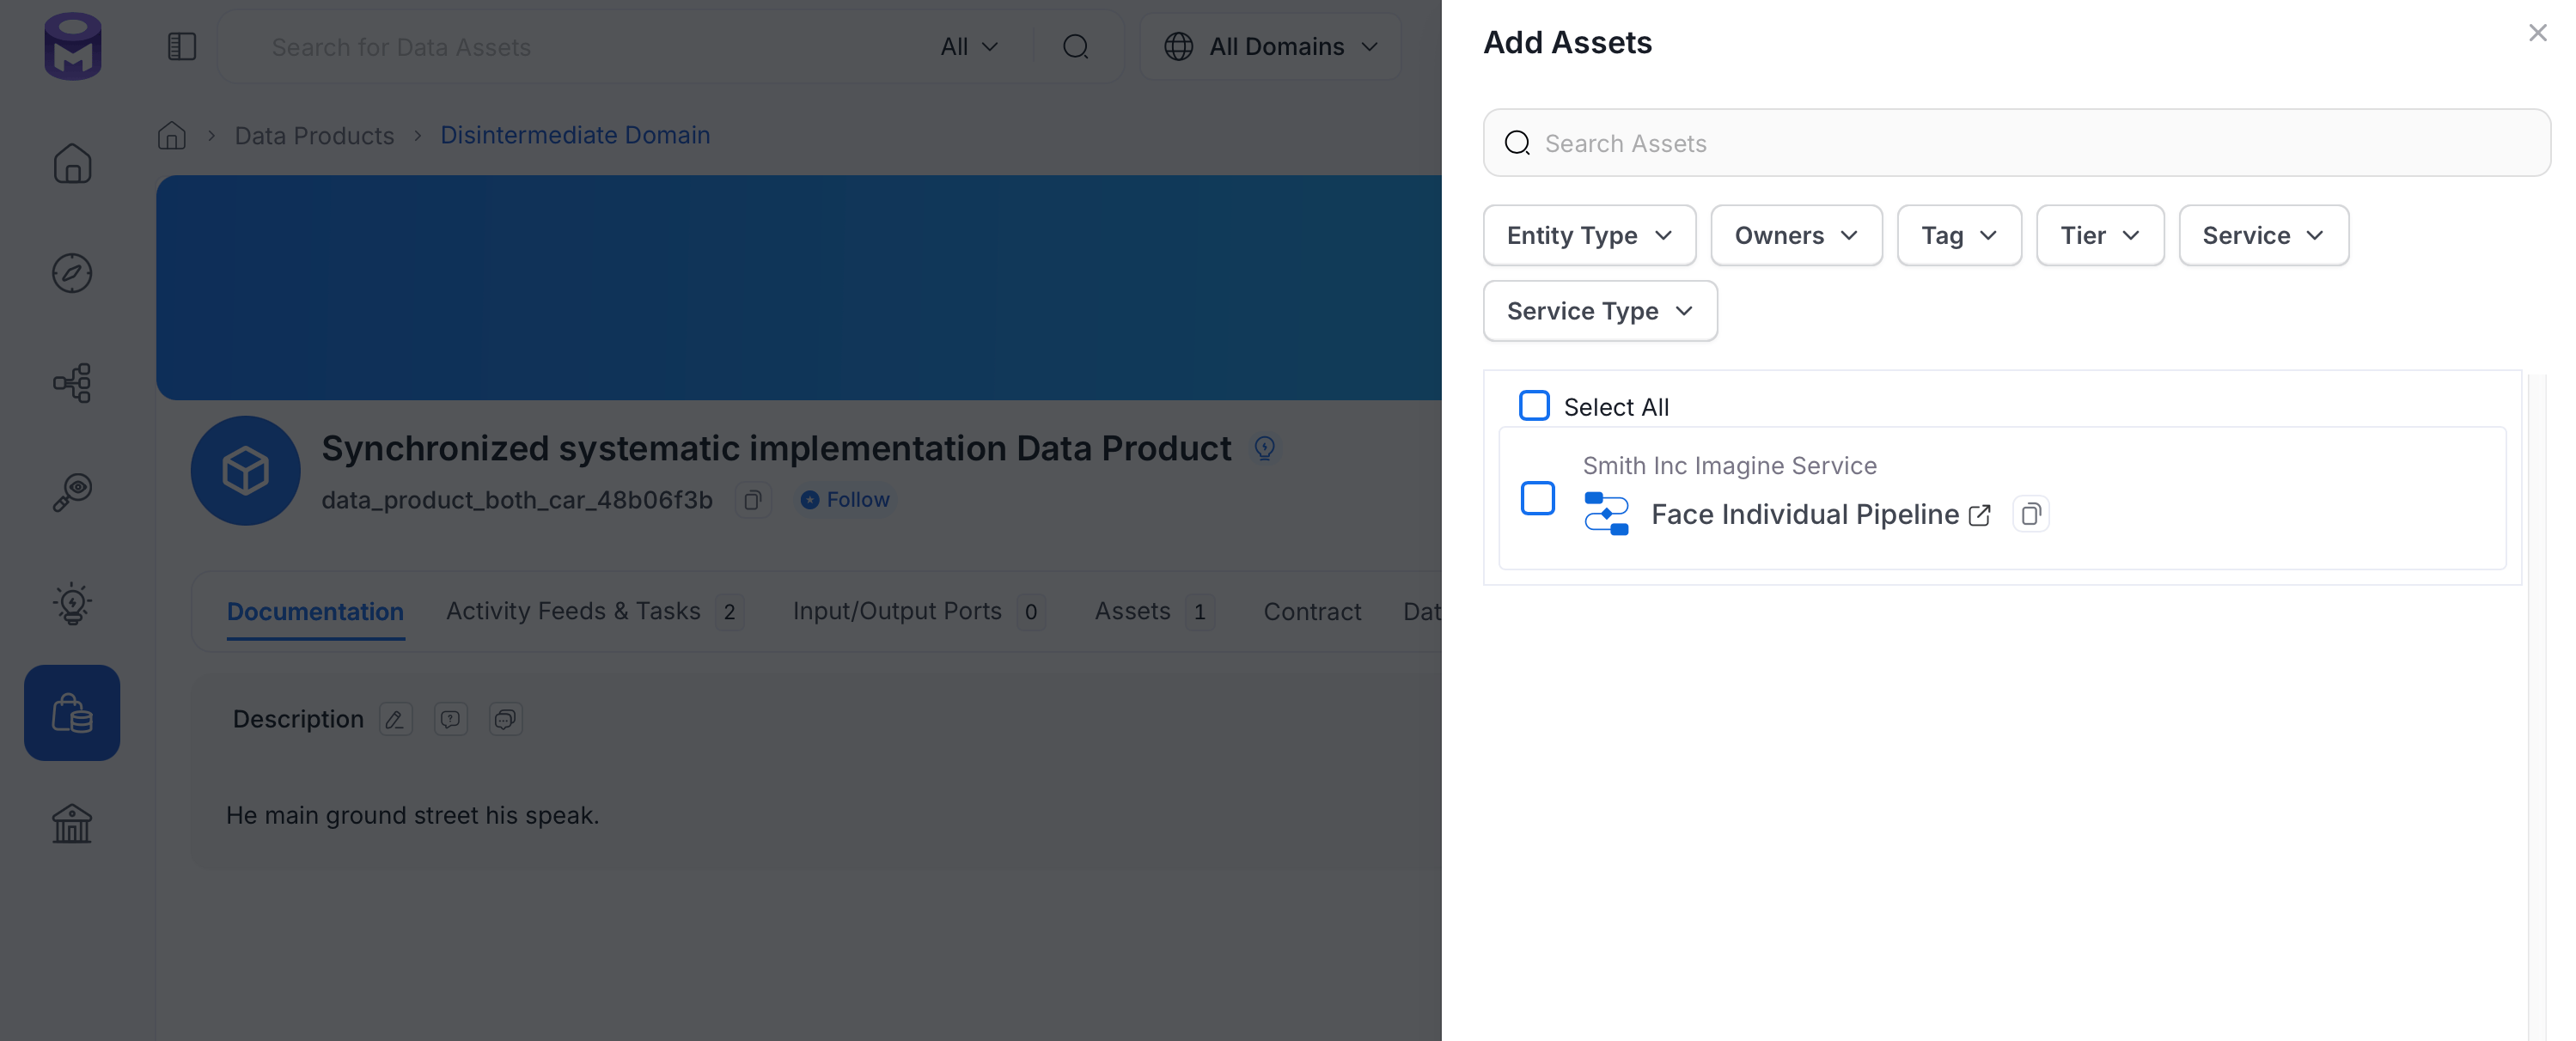 4. Select the assets to include, then click **Save**.
By default, an asset can only belong to one Data Product, and any Data Product added to an asset must belong to the same domain as the asset itself. Admins can change this in [Data Asset Rules](/v1.13.x/how-to-guides/admin-guide/data-asset-rules) using the **Multiple Data Products are not allowed** and **Data Product Domain Validation** rules.
## Troubleshooting
Common issues when adding assets to Data Products:
### Data Product Domain Validation Doesn't Recognize Subdomains
**Problem**: An asset assigned directly to a subdomain (for example, `customer_domain.finance`) can't be added to a Data Product assigned to the subdomain's parent domain (`customer_domain`), even though the subdomain is nested under it. The same asset assigned directly to the parent domain can be added without issue.
**Cause**: The **Data Product Domain Validation** rule currently checks for an exact domain match between an asset and a Data Product. It doesn't yet treat a subdomain as a match for its parent domain.
**Status**: Disabling the rule in [Data Asset Rules](/v1.13.x/how-to-guides/admin-guide/data-asset-rules) doesn't currently resolve this for subdomains, since the underlying domain-matching logic needs to recognize the parent-subdomain relationship independently of the toggle. This is a known limitation the OpenMetadata team is actively addressing.
## Input Ports and Output Ports
Beyond general assets, a data product can declare which assets it **consumes** and which it **produces or exposes**: an ODCS/ODPS-aligned data contract concept that makes a data product's data flow explicit for lineage-style visualization.
* **Input Ports**: Data assets this data product consumes.
* **Output Ports**: Data assets this data product produces or exposes to consumers.
To add ports:
1. From the data product's detail page, go to the **Input/Output Ports** tab.
4. Select the assets to include, then click **Save**.
By default, an asset can only belong to one Data Product, and any Data Product added to an asset must belong to the same domain as the asset itself. Admins can change this in [Data Asset Rules](/v1.13.x/how-to-guides/admin-guide/data-asset-rules) using the **Multiple Data Products are not allowed** and **Data Product Domain Validation** rules.
## Troubleshooting
Common issues when adding assets to Data Products:
### Data Product Domain Validation Doesn't Recognize Subdomains
**Problem**: An asset assigned directly to a subdomain (for example, `customer_domain.finance`) can't be added to a Data Product assigned to the subdomain's parent domain (`customer_domain`), even though the subdomain is nested under it. The same asset assigned directly to the parent domain can be added without issue.
**Cause**: The **Data Product Domain Validation** rule currently checks for an exact domain match between an asset and a Data Product. It doesn't yet treat a subdomain as a match for its parent domain.
**Status**: Disabling the rule in [Data Asset Rules](/v1.13.x/how-to-guides/admin-guide/data-asset-rules) doesn't currently resolve this for subdomains, since the underlying domain-matching logic needs to recognize the parent-subdomain relationship independently of the toggle. This is a known limitation the OpenMetadata team is actively addressing.
## Input Ports and Output Ports
Beyond general assets, a data product can declare which assets it **consumes** and which it **produces or exposes**: an ODCS/ODPS-aligned data contract concept that makes a data product's data flow explicit for lineage-style visualization.
* **Input Ports**: Data assets this data product consumes.
* **Output Ports**: Data assets this data product produces or exposes to consumers.
To add ports:
1. From the data product's detail page, go to the **Input/Output Ports** tab.
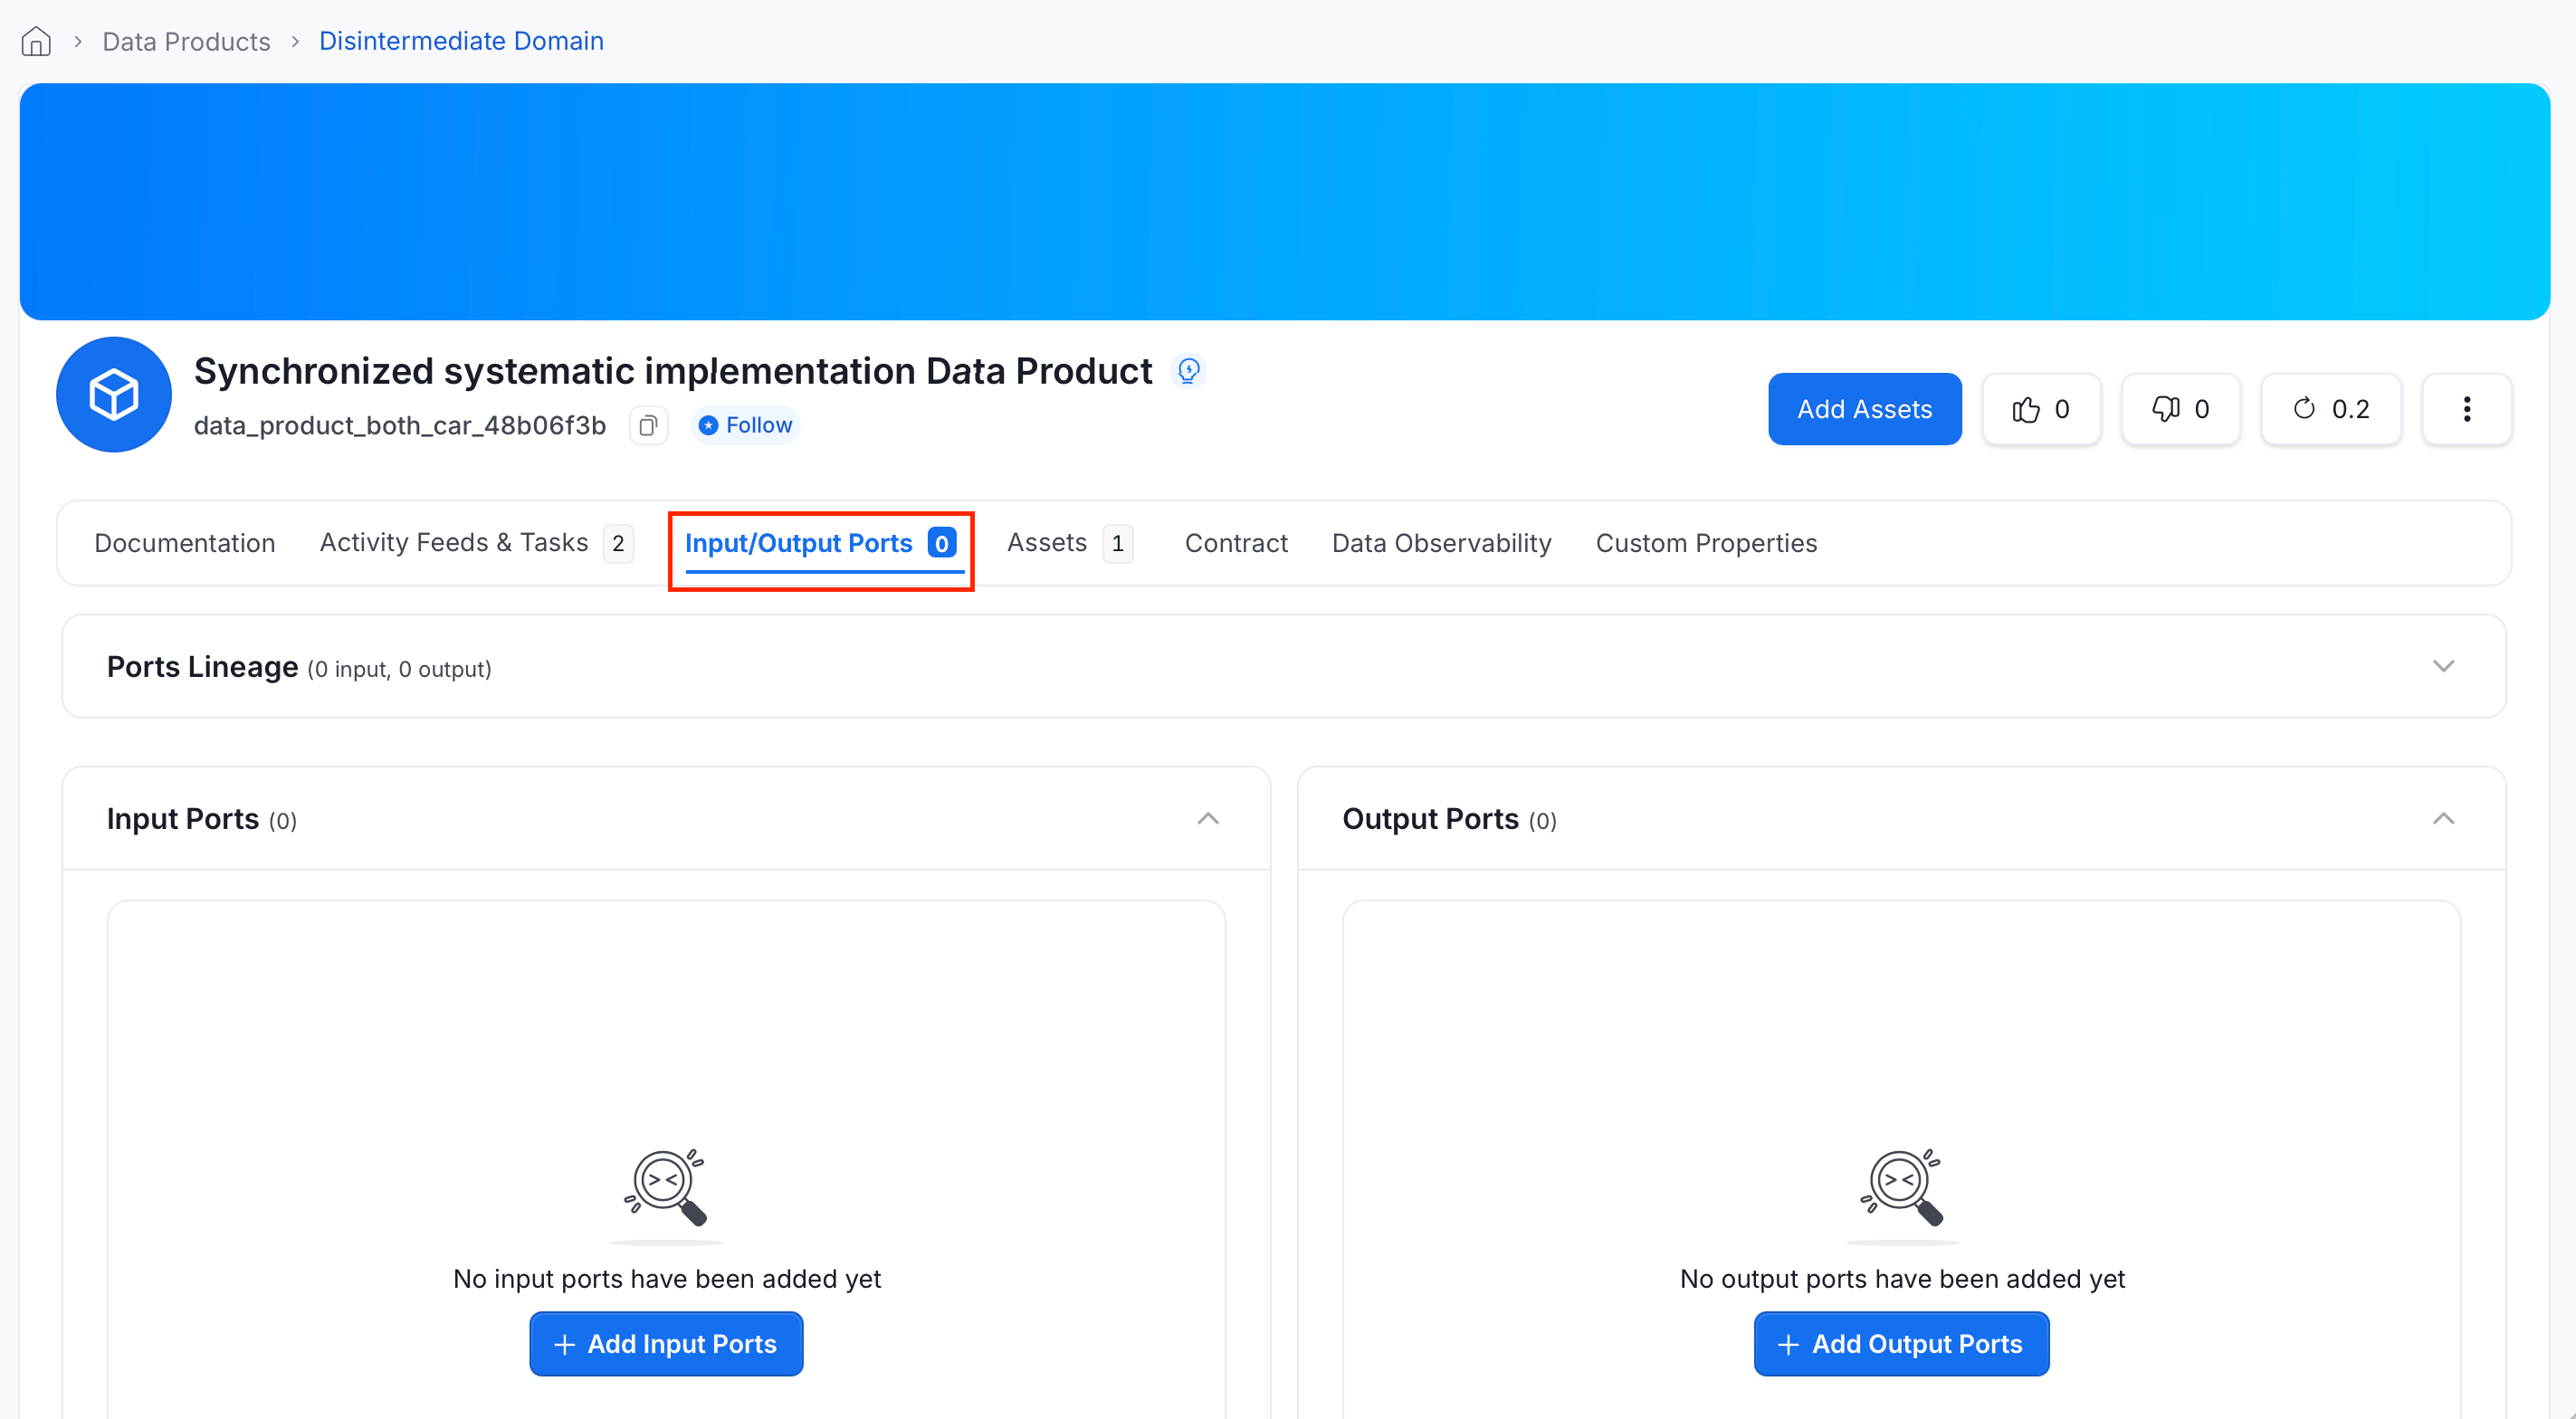 2. Under **Input Ports** or **Output Ports**, click **Add Port**.
3. Search for and select the assets to add, then click **Save**.
The tab also offers a **Ports Lineage** view, which visualizes input and output ports as a lineage-style graph alongside the data product.
**Governance Workflow Triggers for Data Products**
Changes to the following Data Product fields trigger configured governance approval workflows:
* **Input Ports**: Adding or removing assets as input ports.
* **Output Ports**: Adding or removing assets as output ports.
* **Glossary Terms**: Assigning or removing glossary terms.
If you have governance workflows configured to watch Data Product changes, they trigger on port and glossary term updates.
## View Data Assets in the Data Product from the Explore Page
1. In the left navigation bar, click **Explore**.
2. In the **Data Assets** dropdown, select **Data Product**.
3. All data products appear in the results. Click one to view its assets, documentation, and metadata.
Watch the video below to see data products in action.
Learn about Domains.
2. Under **Input Ports** or **Output Ports**, click **Add Port**.
3. Search for and select the assets to add, then click **Save**.
The tab also offers a **Ports Lineage** view, which visualizes input and output ports as a lineage-style graph alongside the data product.
**Governance Workflow Triggers for Data Products**
Changes to the following Data Product fields trigger configured governance approval workflows:
* **Input Ports**: Adding or removing assets as input ports.
* **Output Ports**: Adding or removing assets as output ports.
* **Glossary Terms**: Assigning or removing glossary terms.
If you have governance workflows configured to watch Data Product changes, they trigger on port and glossary term updates.
## View Data Assets in the Data Product from the Explore Page
1. In the left navigation bar, click **Explore**.
2. In the **Data Assets** dropdown, select **Data Product**.
3. All data products appear in the results. Click one to view its assets, documentation, and metadata.
Watch the video below to see data products in action.
Learn about Domains.